
How to Configure and Provision Database Sharding
Learn how to implement database sharding to scale your systems and manage large datasets effectively with practical, step-by-step guidance.


Database sharding is the process of splitting up records that would normally be held in the same table or collection and distributing them across multiple machines, which are also known as shards.

Sharding is especially useful in cases where you’re working with large amounts of data, as it allows you to scale your base horizontally by adding more machines that can function as new shards.

In this complete tutorial, you’ll learn how to deploy a sharded MongoDB cluster with 3 shards in 5 simple steps:
· Step 1 — Set Up MongoDB Servers
· Step 2— Set Up MongoDB Config Server
· Step 3— Configure Shard Server Replica Sets
· Step 4 — Launch Query Router and Add Shards to the Cluster
· Step 5 — Partition Collection Data
You’ll also learn how to choose an appropriate shard key and verify whether your MongoDB documents are being split up across shards correctly and evenly.
Understanding MongoDB’s Sharding Architecture
Before getting started, let’s first understand MongoDB’s sharding architecture.
In a standalone MongoDB setup, you directly connect to a single server to manage your data. However, with a sharded cluster, data is split across multiple nodes, so some documents are stored on one server while others are on another.

If you connect to just one node, you’ll only see part of the data. And if you modify data directly on one shard, it could lead to inconsistencies across the cluster.
To avoid these issues, MongoDB’s sharded clusters consist of three key components:
Shard servers: Each shard stores part of the overall data and must be set up as a replica set. To benefit from sharding, you need at least two shards.
Config server: Stores metadata and settings for the cluster, ensuring proper setup and management. Like shard servers, it must be a replica set to maintain high availability.
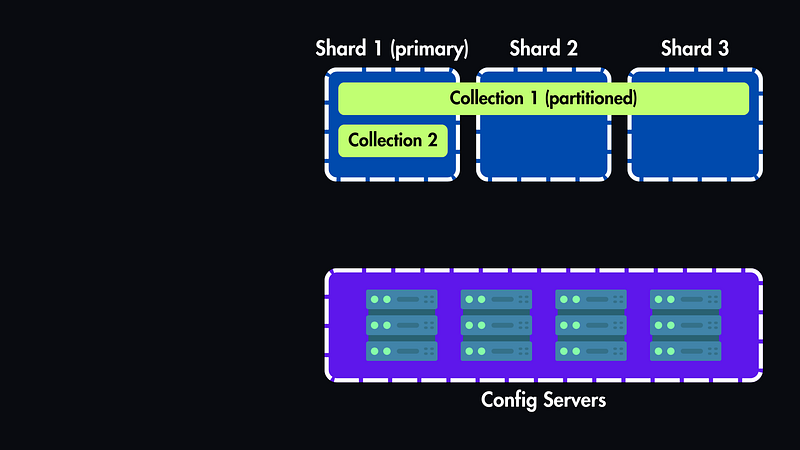
mongos: A query router that directs application queries to the right shard.

All client connections go through this Query Router, making the cluster’s complexity invisible to the application.

And sharding in MongoDB happens at the collection level, so a database can have both sharded and unsharded collections. Unsharded collections live entirely on the primary shard, while sharded collections are spread across multiple shards.
Step 1 — Set Up MongoDB Servers
You can use any virtual server to set up these clusters, like AWS EC2, Digital Ocean Droplets, etc.
1.1. Create the Servers
Create five servers — three for the shards, one for the config server, and one for the query router (mongos).

Set up SSH keys for secure access and open the following firewall ports by running ufw allow PORT_NUMBER/tcp in the appropriate server terminal.
Port 27017 for MongoDB
Port 27019 for the config server

Also, configure the firewall and allow access to the server through SSH:
ufw allow ssh
ufw enable
Then, complete the following steps for each of the three shard servers: shard1, shard2, and shard3.
1.2. Install MongoDB

1. MongoDB signs its software with a GPG key, and by adding this key to your server, you ensure that the MongoDB packages you install are genuine and secure. Import the GPG key for the latest MongoDB version:
curl -fsSL https://www.mongodb.org/static/pgp/server-4.4.asc | sudo apt-key add -2. Create a new sources file for MongoDB in the sources.list.d directory named mongodb-org-4.4.list.
echo "deb [ arch=amd64,arm64 ] https://repo.mongodb.org/apt/ubuntu focal/mongodb-org/4.4 multiverse" | sudo tee /etc/apt/sources.list.d/mongodb-org-4.4.list3. After running this command, update your server’s local package index so it knows where to find the mongodb-org package:
sudo apt update4. Following that, you can install MongoDB:
sudo apt install mongodb-org1.3. Run MongoDB

Ensure MongoDB is running on each server:
sudo systemctl start mongod.serviceThen check the service’s status with:
sudo systemctl status mongodNow, you have installed and run MongoDB on all the servers.

Step 2— Set Up MongoDB Config Server
Next, you’ll configure one of your instances (config) as a replica set, enabling it to function as the config server for your sharded cluster.

2.1. Configure Replication & Sharding
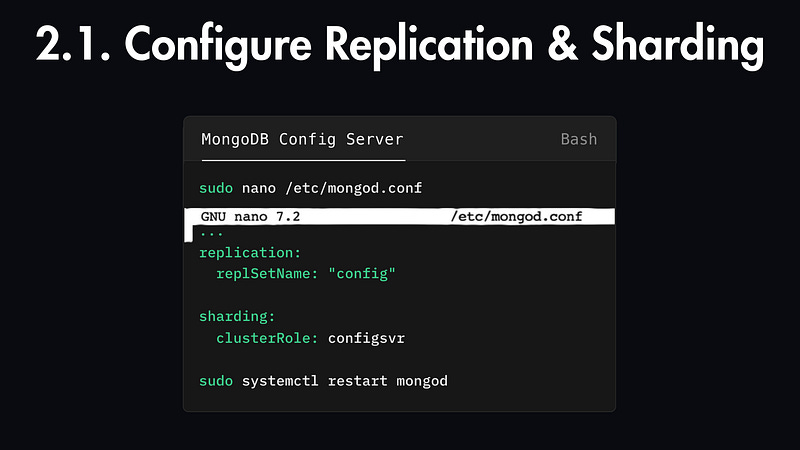
On the config instance, open the MongoDB configuration file:
sudo nano /etc/mongod.confLocate the lines labeled #replication: and #sharding: near the bottom.
. . .
#replication:

#sharding:
Uncomment the #replication line and add the replica set name, then uncomment the #sharding line and specify the cluster role as a config server:
. . .
replication:
  replSetName: "config"

sharding:
  clusterRole: configsvr
This setup tells MongoDB that this instance is part of a sharded cluster and will serve as a config server.
Save your changes and restart the MongoDB service:
sudo systemctl restart mongod2.2. Start Replication through the Shell

With that, you’ve enabled replication for the server. However, the MongoDB instance isn’t yet replicating any data.

You’ll need to start replication through the MongoDB shell, so open it up with the following command:
mongoNow you’re inside the MongoDB shell prompt, run the following command to initiate the replica set:
rs.initiate()This command will start the replication with the default configuration inferred by the MongoDB server. If the setup is successful, you’ll see the following output:
{
        "info2" : "no configuration specified. Using a default configuration for the set",
        . . .
        "ok" : 1,
        . . .
}
Your MongoDB shell prompt will change to indicate the replica set status:
config: SECONDARY>The first part of this new prompt will be the name of the replica set you configured previously.
If you press ENTER after waiting a few moments, the prompt will update to reflect that you’re connected to the replica set’s primary member:
config: PRIMARY>Verify the Configuration
You can verify that the replica set was configured properly by executing the following command in the MongoDB shell:
rs.status()Key details to look for:
“set” shows the replica set name (config).
“configsvr” should be true, indicating this is a config server.
“ok” should be 1, confirming everything is running smoothly.
With this, you’ve successfully set up the config server replica set for your sharded cluster. The next step is to configure the individual shard servers similarly.
Step 3— Configure Shard Server Replica Sets
Now that you’ve set up the config server replica set, it’s time to convert the shard1, shard2, and shard3 instances into replica sets that will act as shards in your sharded cluster.
3.1. Configure the Shards

For shard1, shard2, and shard3, open the MongoDB configuration file in a text editor:
sudo nano /etc/mongod.confUncomment Replication and Sharding Sections
In this file, locate the following sections, which are commented by default:
...
#replication:

#sharding:
Uncomment the #replication line and add a replSetName directive. Each shard will use a unique name:
replication:
  replSetName: "shard1"
sharding:
  clusterRole: shardsvr
replication:
replSetName: "shard2"
sharding:
clusterRole: shardsvrreplication:
replSetName: "shard3"
sharding:
clusterRole: shardsvrRestart the MongoDB Service
After updating and saving the configuration files, restart the mongod service on each server:
sudo systemctl restart mongod3.2. Start Replication through the Shell

Next, open the MongoDB shell on these shard servers:
mongoTo initiate replication, run:
rs.initiate()Wait a few moments, then press ENTER. The prompt will update to indicate the replica set’s primary status shard1:PRIMARY>. To check if each shard is configured properly, run:
shard1:PRIMARY> rs.status()For shard1, the output should include:
"set" : "shard1",
"ok" : 1
With that shard1, shard2 and shard3 are now configured as single-node replica sets and are ready to serve as shards in the cluster.
Step 4 — Launch the Query Router and Add Shards to the Cluster
Now that you’ve set up the config server and two shard servers as replica sets, the next step is to connect them into a sharded cluster. This is done using a query router, which manages communication between the config server and the shard servers.

You will set up this query router on a fifth MongoDB server, mongos. Here’s how you can do it:
4.1. Connect to the config server
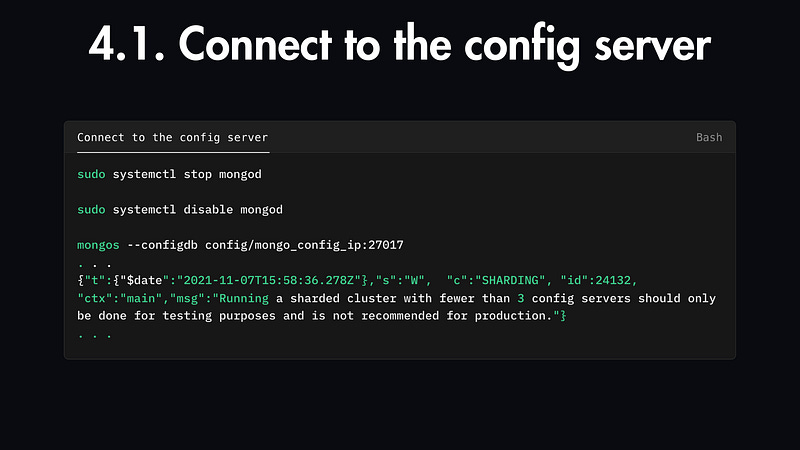
Stop the MongoDB Database Service on mongos
Since mongos won’t act as a database server, stop the MongoDB service:
sudo systemctl stop mongodDisable the Service from Auto-starting
To ensure mongod doesn’t start automatically on mongos, disable it:
sudo systemctl disable mongodRun mongos
Now, run the mongos process and connect it to your config server replica set:
mongos --configdb config/mongo_config_ip:27017Replace
configwith the replica set name you defined earlier andmongo_config_ipwith the IP address of your config server.
4.2. Add shards to the cluster

Connect to the MongoDB Shell on mongos
With mongos running, open another terminal window and start a MongoDB shell connected to the mongos:
mongoYour shell prompt will indicate the router connection by changing to:
mongos>Verify the Query Router Connection
Run the following command to check the status of the sharded cluster:
sh.status()You should see that no shards are currently connected:
shards:
active mongoses:
. . .
Add Shards to the Cluster
In this example, shardN is the replica set name of the first shard, and mongo_shardN_ip is the IP address of the server on which that shard (shardN) is running:
sh.addShard("shard1/mongo_shard1_ip:27017")sh.addShard("shard2/mongo_shard2_ip:27017")sh.addShard("shard3/mongo_shard3_ip:27017")Verify that Shards Have Been Added
Run sh.status() again to verify that all 3 shards are now connected to the cluster:
sh.status()
Now, your MongoDB cluster is fully operational with 3 shards.
Step 5 — Partition Collection Data
Within every sharded MongoDB cluster, one shard is designated as the primary shard. This shard stores any non-partitioned data in addition to its share of partitioned data.
To start interacting with databases, documents, and collections in your sharded cluster, you can use the mongos query router. However, without additional setup, any new data you insert will be stored only on the primary shard, and you won’t benefit from sharding.

To fully leverage your sharded MongoDB cluster, you need to enable sharding for a database. MongoDB databases only support sharded collections if sharding is enabled for that database.
Example: Populating Data for Sharding
To illustrate MongoDB’s partitioning behavior, let’s use a collection of documents representing some of the world’s most populated cities. For example, here’s a document representing New York:
{
    "name": "New York",
    "country": "US",
    "continent": "North America",
    "population": 8,258,035
}
You’ll store these documents in a database called populations and a collection called cities.
5.1. Enable sharding on the populations database
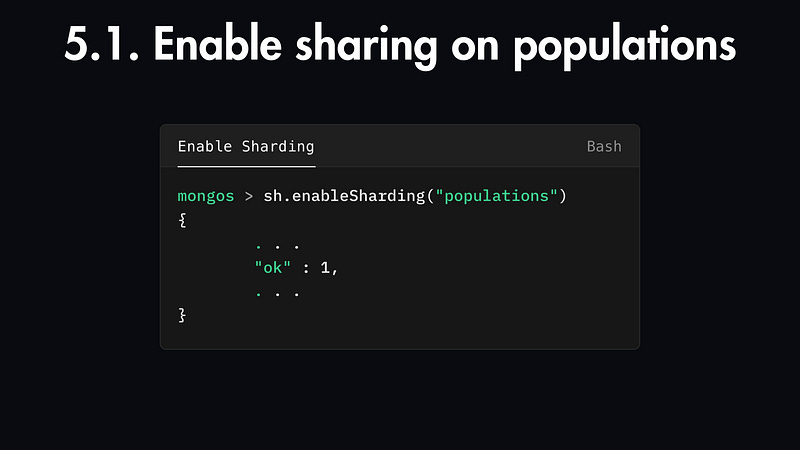
First, enable sharding for the populations database with the following command:
sh.enableSharding("populations")Once sharding is enabled for the database, you can now partition the cities collection.
Sharding Strategy
MongoDB offers two main ways to shard collections: ranged sharding and hashed sharding. For this guide, we’ll focus on hashed sharding, where MongoDB maintains an automated hashed index on a chosen shard key to distribute documents evenly.
Now, choosing the right shard key is crucial, as a poorly chosen key can diminish the benefits of sharding. A good shard key should:
Have high cardinality (many unique values).
Avoid a high frequency of duplicate values.
Be commonly used in query filters.
5.2. Shard the cities collection

In our example, the country field is a good shard key because it has high cardinality and is often used in queries.
sh.shardCollection("populations.cities", { "country": "hashed" })5.3. Inserting Sample Data
Now that sharding is configured, you can insert sample documents. Switch to the populations database:
use populations

db.cities.insertMany([
    {"name": "Seoul", "country": "South Korea", "continent": "Asia", "population": 25.674 },
    {"name": "Mumbai", "country": "India", "continent": "Asia", "population": 19.980 },
    {"name": "Lagos", "country": "Nigeria", "continent": "Africa", "population": 13.463 },
    // ... more cities
])
MongoDB will automatically distribute these documents across the shards.
5.4. Checking Data Distribution

To check how your data is distributed across the shards, use the following command:
db.cities.getShardDistribution()The output will provide statistics about the distribution of data across your shards, showing how evenly the documents are spread out based on the hashed partitioning strategy.
Shard shard3 at shard3/mongo_shard3_ip:27017
 data : 943B docs : 79 chunks : 2
 ...

Shard shard2 at shard2/mongo_shard2_ip:27017
 data : 943B docs : 73 chunks : 2
 ...

Shard shard1 at shard1/mongo_shard1_ip:27017
 data : 1KiB docs : 64 chunks : 2
 ...

Totals
 data : 2KiB docs : 216 chunks : 6
 Shard shard3 contains 36.5% data, ...
 Shard shard2 contains 33.8% data, ...
 Shard shard1 contains 29.6% data, ...
This output indicates that the automated hashing strategy on the country field resulted in a mostly even distribution across three shards.
Summary
You’ve now successfully set up a sharded MongoDB cluster, enabled partitioning for a collection, and inserted data that has been evenly distributed across multiple shards.
And by choosing the right shard key and using hashed sharding, you’ve optimized your cluster for efficient data distribution.
If you’re interested in learning more about how database replication and sharding work together to improve scalability and fault tolerance, be sure to check out my Database Replication & Sharding post next.
